
Hello everyone! Candy Colwell here and I am so excited to be sharing this step by step tutorial on how to create this very sweet vintage 8x8 canvas.
Our theme this week is "Good To Be Green".
So many things inspired this piece. When I think of summer, I think of the lush greenery, people with "green thumbs" and the beautiful, fragrant flowers that grace us with their presence in the summertime.
So many things inspired this piece. When I think of summer, I think of the lush greenery, people with "green thumbs" and the beautiful, fragrant flowers that grace us with their presence in the summertime.

So, from that, "Bloom Where You Are Planted" was born. I hope that this dimensional celebration of summer inspires you to be creative, have fun with your art and not be afraid to try something new!
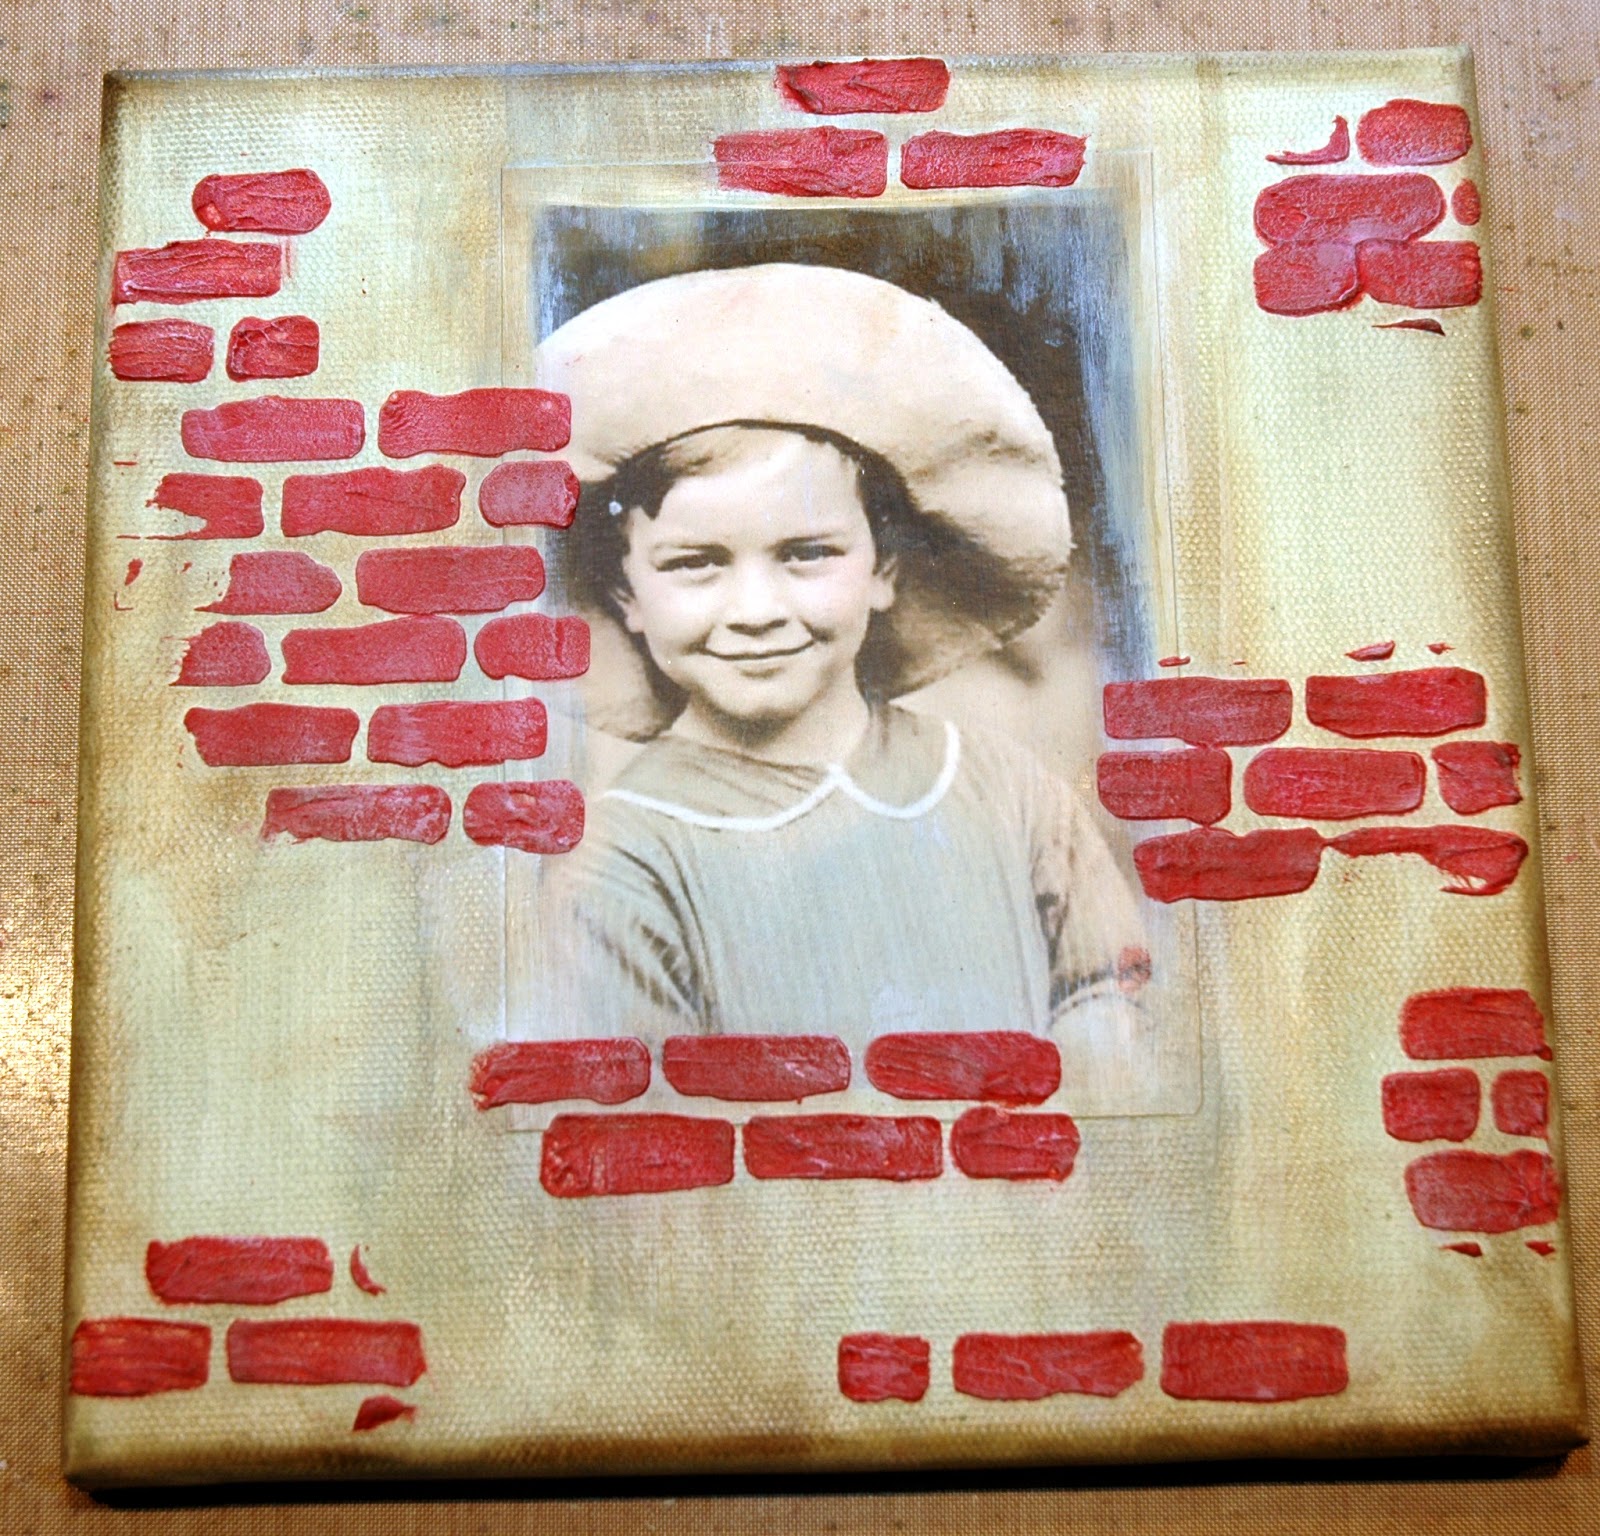
Step 1: Begin with a plain 8x8 stretch canvas.
Step 2: Find a vintage photograph to use in the center of your canvas and
size it to approximately 3"x 5". I found this sweet image on the internet a long time ago and the photo was naturally tinted green - which is perfect for this canvas!
 Note: I left about a 1/4" border all the way around to more resemble an old photograph, but that is optional.
size it to approximately 3"x 5". I found this sweet image on the internet a long time ago and the photo was naturally tinted green - which is perfect for this canvas!


Step 4: Add Bundled Sage Distress Paint all over the canvas, including the sides and allow to dry. On a non-stick craft sheet add a spritz of water and some Peeled Paint Distress Paint. Lightly brush this onto the canvas using a paint brush to achieve that streaked effect and let it dry.

Step 5: Mix a few drops of Fired Brick Reinker into White Embossing Paste. Mix the color until you achieve the brick color you want, and then lay the brick wall stencil randomly over the canvas and scrape the embossing paste onto the canvas. Be sure to allow it to dry or use a heat tool before adding more bricks. Repeat this process until you are happy with the placement of your bricks.
Tip: After applying a couple of bricked areas, clean the stencil before applying more to be sure you are not transferring excess paste onto your canvas.
Now that our background is done, let's move on to the embellishments!

Step 7: Paint chipboard letters "BLOOM" with Pitch Paint Dabber and let dry. Then ink the letters with Vesamark (or any clear embossing ink) and cover with clear UTEE (ultra thick embossing enamel). Place the letters on your craft sheet and return the left over UTEE to the container. Heat the letters until the Clear UTEE is melted, leaving a shiny dimensional letter.


Step 8: Create an 8" picket fence out of a 6" Tim Holtz On The Edge die cut titled On The Fence. Line up one end of an 8" x 2 1/2" strip out of plain Grungeboard on the edge of the die as you normally would. Leave about 1/2" at the bottom for a good base to the fence. To extend the fence, take the uncut portion of the Grungeboard and line it up next to the last picket in the fence where they would normally join together with the next picket.
Lay the Grungeboard between the plastic sandwich pieces and cut it. You will have an extended 8" piece of fence that is barely noticeable where they were joined together.


Step 9: Paint the fence with a basecoat of Espresso Adirondak Paint Dabber and let dry. Next add a thin coat of Paper Artsy's Fresco Finish Crackle Glaze.
When almost dry, add a light top coat of Fresco Finish Snowflake. Within 20 seconds (no exaggeration), the fence starts to crackle! When dry, distress the fence with Gathered Twigs Distress Ink.

Step 10: Lightly dry brush little clay pots with the Snowflake paint. Then add a green wire for a "stem" into some moss or other filler and stuff into your pots. To adhere the pots, use hot glue the pots onto the fence and wire them on using a dark wire.
note: I had some tiny clay pots to decorate for this piece, if you don't have any you can always die cut some from paper first.
Step 11: Create the little roses and daisies/sunflowers from the Susan's Garden Collection Sizzix dies.


For this miniature sunflower, you begin by placing the die cuts (blades up) onto the platform and covering them with cardstock then the plastic cover.
Create dimension on the petals, leaves and calyx using Susan's Tool Kit. The kit comes with everything you need to create all of her fabulous flower creations. I also used some brown chalk to color each petal at the base.
 Glue the first row of petals onto each of the projections from the calyx. Then repeat for the second row of petals, stacking them in between each of the petals on the first row.
Glue the leaves to the underside and all that is left is adding the center. On the canvas, I cut a small white pom poms in half, sprayed them with Vintage Photo Distress Stain and glued them to the centers.
 For a different look on this sunflower, I added a little glue to the center of sunflower and added small brown seed beads. Be creative with your centers!
Note: here is also a wonderful set of videos and PDFs on Sizzix' website to help you when creating all of the Susan's Garden flowers. I found it helpful to have Susan's set of tools when creating these precious little flowers.
When you finish creating the roses, daisies and sunflowers, set the daisies and sunflowers to the side to put in place later. Hot glue the roses to the green wires coming out of the pots.
Step 11: Create the little roses and daisies/sunflowers from the Susan's Garden Collection Sizzix dies.


For this miniature sunflower, you begin by placing the die cuts (blades up) onto the platform and covering them with cardstock then the plastic cover.
Create dimension on the petals, leaves and calyx using Susan's Tool Kit. The kit comes with everything you need to create all of her fabulous flower creations. I also used some brown chalk to color each petal at the base.

Glue the leaves to the underside and all that is left is adding the center. On the canvas, I cut a small white pom poms in half, sprayed them with Vintage Photo Distress Stain and glued them to the centers.

Note: here is also a wonderful set of videos and PDFs on Sizzix' website to help you when creating all of the Susan's Garden flowers. I found it helpful to have Susan's set of tools when creating these precious little flowers.
When you finish creating the roses, daisies and sunflowers, set the daisies and sunflowers to the side to put in place later. Hot glue the roses to the green wires coming out of the pots.
Step 12: Print some vintage seed packet images 1 3/4" x 2 3/4" onto a sheet of cardstock,
leaving enough space between them so you can create an envelope.
Note: you could also purchase little pre-made seed packets like these from Webster's Pages or these from Jenni Bowlin.
 In this case, the image of the seed packet was 1 1/2" across. Make sure that the sides, when folded behind would overlap just enough to be glued together with 1/4" Scor Tape. The top and bottom flaps are 1/2". Fold the sides inward, using a Bone Folder for a better crease and trim the edges slightly inward.

 Apply the 1/4" Scor Tape to the overlapping side of the seed packet and across the bottom tab. Seal the pieces together, creating the little seed packet.


Use a CropADile Radius Chomper (in this case, I used the 1/8" side) to create the rounded edges on the top flap.
Distress the inside and outside of the flap with Gathered Twigs Distress Ink. A perfect little replica of an antique seed packet!
leaving enough space between them so you can create an envelope.
Note: you could also purchase little pre-made seed packets like these from Webster's Pages or these from Jenni Bowlin.


Use a CropADile Radius Chomper (in this case, I used the 1/8" side) to create the rounded edges on the top flap.
Distress the inside and outside of the flap with Gathered Twigs Distress Ink. A perfect little replica of an antique seed packet!

Step 13: Print words onto cardstock in the font of your choice, or use small letter or word stamps or stickers to create additional words for your canvas. Mount the words onto black cardstock so that a thin border shows, then rub the edges lightly with gilding wax.
Note: My letters were approximately 3/8" high and anywhere between 1 1/4" (you and are), 1 1/3" (where) and 2" (planted) long.
Note: My letters were approximately 3/8" high and anywhere between 1 1/4" (you and are), 1 1/3" (where) and 2" (planted) long.
Now that the pieces are all made, it's time for assembly! Here are my notes for assembling this canvas:
- Place your letters (bloom) onto the canvas using Glossy Accents.
- Add pop dots to the back of the words that you printed out, but don't adhere them until you've added the flowers.
- Use pop dots on the fence before adhering.
- Use hot glue when attaching the seed packets in place on top of the fence.
- Stick random length green wire "stems" inside of the seed packets and hot glue the ends of them in place on the canvas where you want a flower to be.
Finally, to finish off the outer edge of the canvas, I ran a 1/2" inch piece of black ribbon around the perimeter of the canvas and attached it using 1/2" Scor Tape all the way around.
I hope that my "Bloom Where You Are Planted" canvas has inspired you to let your crafting bloom this week and enter our challenge.
 Thanks to Candy for this amazing tutorial! Now are you feeling inspired to make something with a bit of green yourself? Then join us in this week's challenge! Click here to see the rest of the design team's entries and to enter your creation. For the full rules, read the "challenge rules" posted in the side-bar here on our blog.
What a beautiful, vibrant, inspirational piece Candy. I don't want to even think about how much time you put into creating all of these lovely details. That vintage image is the perfect central element to build off of for this piece. All of the embellishments, texture and of course the sentiment breathe life and warmth into it. Gorgeous!!
ReplyDeleteThis is just an incredible piece Candy! You make it seem so easy!
ReplyDeleteA really great make, lovethose seed packets they look fab nestled against your great fence x hugs trace x
ReplyDeleteSTUNNING canvas Candy, wow I looooooved seeing how you created it, the texture is fabulous, all the extra goodies you added were perfect, thanks soooo much for sharing how it was created. Your rock Missy..
ReplyDeleteGreat LO! Indeed a summer one! And those clay little pots are so beautiful on it...
ReplyDeleteGorgeous canvas Candy, I love the vintage image, which you have showcased beautifully, surrounding the image with random brick wall, love it. Love how,you toned the red down on the bricks too. The picket fence is gorgeous with the cute little pots. Love your miniature dimensional flowers and the seed packets are perfect. Fabulous piece. Tracy x
ReplyDeleteGorgeous canvas love all the flowers and your tutorial is so easy to follow. Thanks for sharing
ReplyDeleteOh wow Candy, this canvas is just amazing. I love the flowers you made and the brilliant picket fence - the crackle is fabulous. I love how the photo seems to disappear into the canvas and the randomly placed bricks are brilliant! And then the little seed packets - they are delightful. A truly gorgeous canvas! Hugs, Anne x
ReplyDeleteLove how you blended the image in the background! Fantastic.
ReplyDeleteFABULOUS in every flowery way Candy!!!
ReplyDeletejust stunning Candy!!! So many FINE details-and I can't believe you even made the flowers-I'm impressed!
ReplyDeleteWhat a wonderful summery canvas... The photo makes for a beautiful centrepiece, and the flowers are gorgeous. I can hardly believe that you created those ones petal by petal - wow! Delicious little pots against the fence, and the seed packets are lovely. Thanks for a great step by step, and your usual brilliant inspiration.
ReplyDeleteAlison x
Very beautiful (:o) I never thought about using bright colours in combination with a vintage picture, but it looks stunning!!
ReplyDeleteStunning Candy ! I love all the layers and the bricks and the gorgeous little seed packets. The picket fence and the plant pots are inspirational ! Sue C x
ReplyDeleteWhat a gorgeous creation! Love all the details and thank you for the great tutorial. :)
ReplyDeleteThis is gorgeous! Thank you for the tutorial... pinned!
ReplyDeleteMy written voice echoes all the above sentiments! You could open a really cool shop to show off all your very neat projects. I'd come and visit with every new item. And you have given me some ideas for using the window box die and these mini flower dies...I've made a few already of many of Susan's flowers. They are just so awesome! And having the right tools for the job makes it so easy! Thank you!!!!!!!!!!!!!!!!!!
ReplyDeleteThis tutorial is absolutely stunning! love the little envelopes and bricks on the background, flowers is Amazing! beautiful!!!!!!!!!!BArbarayaya
ReplyDeleteCandy, this is just delightful in every way. It reminds me of my mom's flower garden...full of life and beauty. The texture you added is terrific...and I love those sunflowers and seed packets. Beautiful details...
ReplyDeleteThis is so interesting to look at, so many little details.Thanks for show how you made it:)
ReplyDeleteWhat a stunning project! Such a great green and colorful sight! The garden looks amazing! Hugs, Sandra
ReplyDeletesuch a great tutorial, Candy!!!!
ReplyDeleteI would like to thank everyone so much for sharing your thoughts. I am so happy that this little canvas was inspiring to so many of you and that you all enjoyed it so much. That means the world to me...seriously! It's so nice to have so many lovely and talented ladies, whose work I admire and respect so much, leave such nice comments for me to read. I'm blessed. <3 Candy
ReplyDelete