The "Summer Distress" challenge for this week is still open, so be sure to get your entries uploaded and linked up!
Let's mix this up, and announce the design team's choices for the top 3 from the No Rules challenge last week first! I must tell you- I was amazed by every single entry I had the pleasure of looking at. With more than 400 entries last week - you really blew me away! Thank you all for entering and sharing your talents with us.
Without further delay, here are the top 3 from the No Rules challenge:
Be sure to visit their blogs and check out their amazing entries. So inspiring! Congratulations to each of you on a challenge well done! Please email May for the Top 3 Blinkie.
Now I'd like to thank Simon Says Stamp for another great chance to win a $50 voucher!!
Congratulations! Please claim your prize within the next two weeks by emailing Maywith your details.
I'd like to thank everyone who took part in the challenge. It is always a joy to see what you create. I'd also like to say thank you again to Simon Says Stamp for their generosity - each week we give away a $50 gift voucher to the shop that you can use to buy all kinds of fabulous stamps, inks, and paper crafting supplies. Remember - you just need to enter the challenge each week to be entered into the drawing!
and here's a tip- you'll REALLY want to tune in this Monday for the new challenge... rumor has it there are some surprises in store...
The newest addition to the Tim Holtz distress family is the summer trio of colors. Whether you are inspired by the color palette or just one of the colors, or if you are looking to use your own new distress colors - heat things up this week with Mowed Lawn, Picked Raspberry, and Salty Ocean and see what happens.
Perhaps your summer inspiration takes you to a whole different color palette - we’d love to see that too. Before you do - check out all of the creations that the design team came up with:
Candy has created this colorful dimensional vintage style tag.
I sometimes have trouble using bright color and I know I'm not alone. But I love the new Seasonal Summer Distress Ink colors. And if it's "Tim", I've got to have it! So, employing the faded layers technique, I was able to create a colorful background well within my comfort zone. Combining a Book Plate, images from Tim Holtz' Papillon,Girls Rule and Haberdashery, I was able to achieve a feminine vintage layered look.
I (May) ended up creating a tag using the same French Collage stamp that Candy did, but with a very different end result!
I wanted to feature the summer distress palette in a few ways, so I started by blending the three colors down the tag, then I inked my background stamp with all three colors, added plenty of water, and stamped right over the top. I love that I could layer the colors - but then I wasn't sure what I wanted to do next! I decided to grunge it up with the mixed media stamps and brown ink on the edges, but then I brightened things back up with green trim and a foilheart that features the pink distress ink mixed with paint to color it. If it isn't obvious by now - I'm smitten with these colors both toned down or allowed to shine to their full bright potential!
Inspiration always strikes when Tracyhas a reorganisation in her craft room in the form of found/forgotten pieces, this miniature frame being a perfect example, small in stature but BIG on impact.
I enjoyed working outside my comfort zone of earthy tones, creating my miniature piece with the fabulous new Summer Seasonal Distress Ink colours. The hardest part of this project was working on such a small scale and knowing when to stop. The fractured doll is my focal point and has been given an angelic makeover with the addition of wings from the Regal Adornments.
Suzz had thoughts of beautiful bright colors in Stained Glass windows and Tiffany lamps when she started her project.
My inspiration for this piece started with the bright Summer Seasonal Distress Ink colors and the striking woman in the Crafty Secrets Believe set. I used the distress inks and a waterbrush to color the image and the background. The striking colors reminded me of an Art Deco design which helped me select the black flourishes from the Spellbinders Die Fancy Tags 2.
Bright colors and high contrast are two of Ashli's favorite things, so she was eager to experiment with the Summer Distress colors!
The first thing I usually do when I get new inks, is grab some scraps of white card stock and rub a little here, blend a little there and just see what happens. The colors of the new Summer Distress Inks are so gorgeous, I couldn't bare to toss out my experimental scraps. Instead, they became a banner for my layout! Layered over a fringed remnant of salvaged curtains and a pretty pink paper from Crate's Little Bo Peep collection they are such a fun embellishment. Some chipboard words from Crate's Random collection provided the title.
Those Summer Distress colors are so gorgeous and they reminded me of a lovely summery day, when you hear the birds sing all around, so I wanted to tone those bright colors down a little. I've used lots of Picket Fence Distress Stain and mixed them with the Summer Distress inks by using a brush and did the Wrinkle Free technique to create the background. I've repeated this several times until I was happy with the result.I stamped the Flourish stamp of the Artful Things Stamp Set around the borders with Frost White ColorBox ink for some interest. In front of the Bird Cage die sits the Forest Bird and he is very happy to be out of his cage for the summer.
Anna-Karin went travelling in her imagination and made a little suitcase which opens to reveal an important message and a dimensional scene:
I was feeling really happy so I decided to make this cheerful Tag with the Summer Distress Inks. These colours are really bright and made me really happy. I used all three colours on the background, then I played with the Mini Chicken Wire Stencil and the Tim Holtz Stampset Papillon too. Since I am a huge fan of butterflies and The Tim one too I had to used his fabulous butterflies. I worked on the heart, butterflies and the roses with UTEE and I just love it. It gives such a fabulous glazed look. So what do you get when you mix all these ingredients together? A Happy Summer Cheerful Tag.
Sarah decided to get all inky with a jumbo sized tag and a lots of butterflies to create a summer scene...
I was so glad to open up my bright new inks and feel alive! Being a new mum means lots of sleepless nights and a busy routine so I escaped with a blast of colour and a flurry of free-flying butterflies. I played around with with my Summer Distress Inks, embossing ink and my Dylusions stencil as I thought it would be fun to see how a faux batik method would work with a stencil. I stippled the Distress Inks through the stencil, embossed them with clear powder to 'set' the colour and after removing the embossing powder by iron I could add white highlighting with my Signo Pen. Then the flight of Wendy Vecchi butterflies accompanied by a bright Chit Chat thought for the day.
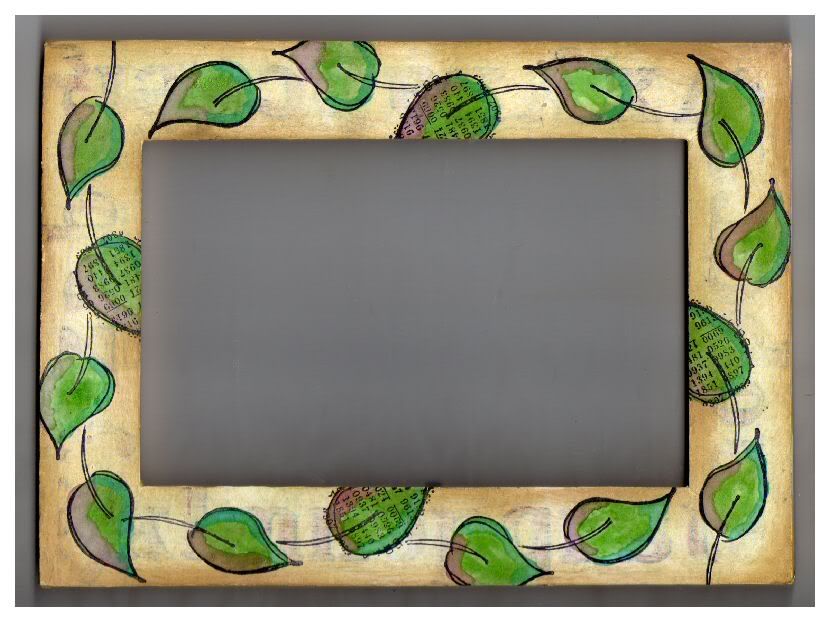
Dan decided to paint with the Summer Distress colours to decorate a plain frame.
They say a picture is worth a thousand words, but it's nothing without a nice frame around it. When I started decorating this frame for my niece I decided that I wanted it to have a subtle element of childhood memory to it, which hopefully is there in the hint of Cavallini abc tape you can see through the gesso. I used all 3 Summer Distress colours on the leaves, painting them with a water brush - I used to use that technique a lot with distress inks, it was nice to revisit it again!
I encourage you to check out each of the design team member's blogs for more photos, supply lists, and more. Simply click on their name (above the photo of their project) to visit their blog.
Now that we've shared the team creations - we're ready to see yours! As always, Simon Says Stamp is giving away a $50 gift voucher that will go to a random entry chosen by Random Generator. The challenge will close at 11:59pm Eastern time on Sunday, September 2 and the winner will be announced during the following week. To qualify all you need to do is create a new project that ties in with our theme and post it to your blog, along with a link back to this challenge, and add a link here.
For the full rules, read the "challenge rules" posted in the side-bar here on our blog.
We can't wait to see what you make!
The "no rules" challenge for this week is open, so be sure to get your entries uploaded and linked up!
Holy smokes. If you're looking for technique inspiration, be sure to scroll down and look at the entries in the favorite technique challenge because they are incredible! So much talent, and so much crafty ideas and goodness shared. Thank you to each and every one of you who entered.
Also, many thanks to Simon Says Stamp for another great chance to win a $50 voucher!!
The lucky (randomly drawn) winner for is...
123 Judy Cantrell
Congratulations! Please claim your prize within the next two weeks by emailing Maywith your details. Now let's talk top 3. Each week our design team members vote for their favorite challenge entries and we share the results here. The prize? A top 3 blinkie and the honor of being chosen as one of the favorite entries of the challenge of course. Huge congrats to these amazing crafters:
Be sure to visit their blogs and check out their amazing entries. So inspiring! Congratulations to each of you on a challenge well done! Please email May for the Top 3 Blinkie.
I'd like to thank everyone who took part in the challenge. It is always a joy to see what you create. I'd also like to say thank you to Simon Says Stamp for their generosity - each week we give away a $50 gift voucher to the shop that you can use to buy all kinds of fabulous stamps, inks, and paper crafting supplies. Remember - you just need to enter the challenge each week to be entered into the drawing!
Rules? We don’t need any rules! With school starting and soccer and busy schedules over here the last thing I want is more rules. So let’s get wild with an ANYTHING goes week. Create something and share with us - we can’t wait to see what you’ve been up to.
Suzz went small on her project today. She pulled out a few dominoes and created a mini book with a Parisian theme.
I participate in a art swap where they have been showcasing some beautiful domino books. They inspired me create my own domino book. I painted the covers of the domino surface using StazOn Metallic - Silver Ink. I stamped the images inside and on the book cover using the Stampendous Charm Collection. The cover is decorated with gems, feathers and a pretty Kaiser Resin Flower. The metallic trim is embossed using silver embossing powder.
Tracy's fellow Design Team member Sarah has recently given birth to a
beautiful baby daughter Ruby and when Sarah sent the team a snapshot, Tracy was inspired almost immediately to create a card to commemorate this special occasion.
The red in Ruby's little outfit inspired me to get my fired brick Distress ink out and create an inky background to showcase Ruby's beautiful snapshot. This card just flowed from start to finish and came together beautifully, I love creating when everything works so perfectly! To add that personal touch I added Ruby's name to jump rings adhered with Glossy Accents along with many gold highlights and machine stitching for that hand made feel.
Ashli is often inspired by a simple sheet of patterned paper, especially when it makes her smile.
"When Pigs Fly, by Graphic 45 just makes me giggle! Those little pigs were just begging to be fussy cut and put on a page. After roughly cutting 7 simple squares from cream card stock, various October Afternoon patterned papers were used to embellish my little interactive folders. A finishing touch of Doodle Twine invites the viewer to open each card and see what lies beneath. Perhaps something silly like... when pigs fly, I will stop drinking coffee!"
Candy knows that the Halloween season of crafting is fast approaching. She's getting a jump on it by creating this spooktacular coffin.
Sandra Mouwen finally received the pictures of the party she organised for her parents, and she utilized them to create this frame album.
My parents are married for 40 years this year and I threw them a surprise party a while back. I wanted to give them something to remember that day. I had this frame laying around and it was perfect for this project. I covered the frame with Tissue Tape and for the cover I used a clear sheet and embossed it with the Collage Embossing Folder. On top of that I cut out the Weathered Clock and painted it black with Pitch Black Paint Dabber and finished it with a the Waterfall Glimmer Glaze. The date of the party is spelled with the Maya Road Bingo Numbers.
I (May) was inspired to try something completely different - after all, it is no rules week, right? I made a crafty video to share and I hope you enjoy. I hope to play with more videos on the challenge blog in future:
Sarah played with a fusion of colours and styles to create her funky card.
I just love this sassy lady from Tim's Pattern Pieces stamp set! I love her retro look and stylish clothes which just ooze lots of 1950's glamour. But I thought I would bring her into the 21st century with a splash of Dylusions Spray Inks and some funky shapes teamed up with Tim's Mixed Media dots. I had fun mixing things up with punched circles, splatters and bold colours, all finished off with Chit Chat words to express my my thought of the day. Be different. Be yourself!
Terry was having fun with the No Rules and made a wallhanger with no rules at all.
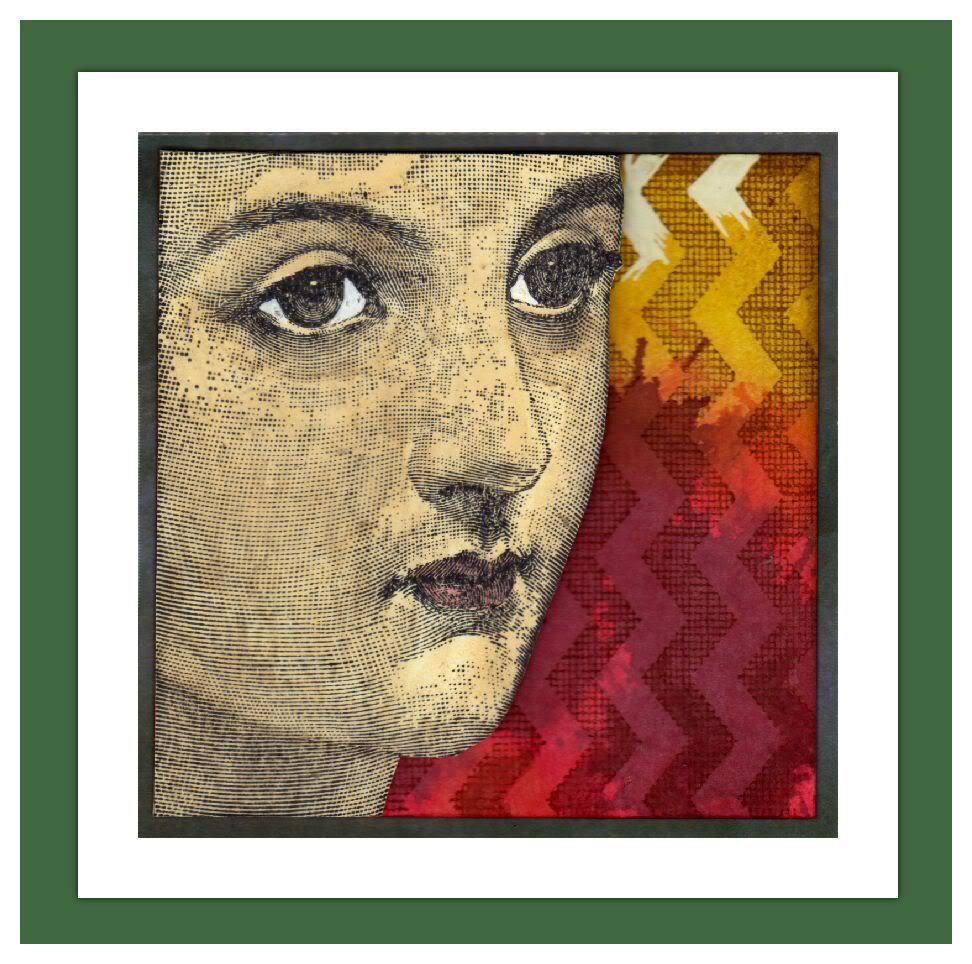
Dan started out to make a card but ended up with something he's framed and put on his wall.
OK, so I'll admit that I don't get to the theatre often enough to have seen the musical Les Miserables, but I have seen the poster and this reminds me of that a bit. Somehow. No? The face is one of Tim Holtz's iconic wood-mounted stamps, happily now available in the Classics #5 set. I'm loving that Tim has brought out these classics wood-free, I only have room for maple on pancakes! Things I used on the background included Distress Stains in Aged Mahogany and Mustard Seed and some Festive Berries Distress Ink.
Anna-Karin made a mini-book called ‘Postcards from the past’
These photos from a visit to an old farming community, which is now a museum, needed a home. The idea behind the mini-book came from the Stamper’s Anonymous Folded Paper stamp, which was stamped as a base for all the pages. A postcard stamp and some ink turned the pages into vintage postcards. The cover was cut from chipboard, covered with a perfect MME woodgrain paper, die-cut with the Sizzix Brackets die, and embellished with an aged clock, some stamping, printed tape and a rose ribbon.
I encourage you to check out each of the design team member's blogs for more photos, supply lists, and more. Simply click on their name (above the photo of their project) to visit their blog.
Now that we've shared their creations - we're ready to see yours! As always, Simon Says Stamp is once again giving away a $50 gift voucher that will go to a random entry chosen by Random Generator. The challenge will close at 11:59pm Eastern time on Sunday, August 26 and the winner will be announced during the following week. To qualify all you need to do is create a new project that ties in with our theme and post it to your blog along with a link back to this challenge, and then add a link here.
For the full rules, read the "challenge rules" posted in the side-bar here on our blog. We can't wait to see what you make.
The "favorite technique" challenge for this week is open, so be sure to get your entries uploaded and linked up! And don't forget to link back to Simon Says Stamp and Show in your post so that you are entered into the drawing. Good luck!
Once again, you've blown us away with your entries! Let's get right to it, and announce the winners of last week's challenge.
The lucky (randomly drawn) winner for the paint it up challenge, the winner of the $50 gift voucher to Simon Says Stamp is...
Congratulations! Please claim your prize within the next two weeks by emailing Maywith your details.
Now let's talk top 3. Each week our design team members vote for their favorite challenge entries and we share the results here. The prize? A top 3 blinkie and the honor of being chosen as one of the favorite entries of the challenge of course. Huge congrats to these amazing crafters:
Be sure to visit their blogs and check out their amazing entries. So inspiring! Congratulations to each of you on a challenge well done! Please email May for the Top 3 Blinkie.
I'd like to thank everyone who took part in the challenge. It is always a joy to see what you create. I'd also like to say thank you to Simon Says Stamp for their generosity - each week we give away a $50 gift voucher to the shop that you can use to buy all kinds of fabulous stamps, inks, and paper crafting supplies. Remember - you just need to enter the challenge each week to be entered into the drawing!
It is a universal truth that we crafters all have our favorite techniques. From something new I just learned from a favorite blogger to long time classics I used years ago. This week, we challenge you to craft with a favorite technique and share with us. What are you into right now? what’s your current favorite? Whether it is simple as sticking bits of tape to your project, distressing metal, using embossing powders, a new ideal all your own, or anything in between we can’t wait to see what you’ve been up to. Let's check in with the design team to see their favorites - and be sure to check in their blogs for more information and how-to as well! My (May Flaum) favorite right now was discovered by happy accident - and I've created a card on gloss paper to show it to you this week.
First of all - I didn't mean to discover this technique! I was creating a card where I used Tim's technique of stamping with Archival ink and then blending distress inks. I had set it aside to work on something else for a while - as I often do. While I was working and misting dylusions on my other project- a bit got onto my card. Whoops! Oh but wait - it showed up in perfect droplets. How did I do that? The happy accident has turned into one of my go-to techniques that you can see put to use here with one of my favorite background stamps and my favorite alphabet set as well. Ashli's favorite technique of all time is using white acrylic paint to create a resist. The second runner up to that is messy stitching. Of course, both of her favorites needed to get onto this page!
With white acrylic paint in hand, the possibilities are endless. Stamp it, paint it, stencil it, or splatter it! For this page, I usedTim Holtz's Movers and Shapers Mini Butterflies to create a stencil to apply my resist as well as to cut out my Kraft Glassine butterfly embellishments. After the paint was dry, I had a good time spritzing and splashing with various stains and mists to create a custom background. The added contrast of the black stitch lines against the white resist along with the movement of the butterflies creates the perfect mix for this playful page about when we first started our family.
Suzz has an infatuation with her glimmer mists, and this layout features her favorite way to use them.
My family lives near Lake Michigan which made an easy decision of where to take Prom pictures this year. My son and his girlfriend look wonderful and the sky was overcast which provided the perfect lighting in addition to the gorgeous beach. I knew the Patina Glimmer Mist - Tattered Angels was the perfect shade to partner with her beautiful dress. I spritzed multiple layers of tissue paper to create a soft background. I added in a hint of rustic with the My Mind's Eye - On the Bright Side paper and softened the layout with flowers from Prima (Laraine,Tasha).
Sandra Mouwen knew the perfect technique to turn to for this week’s tag – perfect distress!
The contrast between shimmering and grunge is simply amazing, and that's why I'm in love with Perfect Distress technique. To create the background I've used Milled Lavender, Antique Linen and Walnut Stain Distress Ink. To achieve the Perfect Distress I've stamped the Subway stamp with Walnut Stain and worked some Blue Raspberry Perfect Pearls onto the ink to give it that blue sparkle. My favorite part of this technique is when you spray the tag with water and the Distress Ink underneath the Perfect Pearls starts to wick.
Terry wanted to make 3 tags because she thinks it's the little things that makes everything big in life.
Tracy Evans was inspired by a new stamp purchase to create her feminine tag.
My favourite technique right now is the Multi-Medium resist, I still love the wow factor achieved from such a simple idea. I was also inspired by the Spring seasonal Distress colours peacock feathers and squeezed lemonade; I was in the mood for a brighter colour palette this time around. I often use browns in my artwork and wanted to try something a little different, a move away from my usual grungy style. I decided this colourful background would work perfectly for a feminine piece, and this Girls Rule image was the perfect choice.
Dan used a range of acrylic paint techniques on this colourful, funky tag.
More and more I find that I'm loving using acrylic paint on my projects. I stencilled the circles on this manila tag and also applied layers of paint with a Ranger Craft Scraper, which basically performs the same function as an artist's palette knife. I've bought palette knives from art supply stores in the past but I find I keep coming back to the Ranger scraper, I just think it feels better in the hand and is more suited to the way I like to apply paint. Claudine Hellmuth paints are my "go to" paints these days and I used an ink blending tool to apply the paint through the stencil. I used a few different stamp sets, including one of Tim Holtz's new releases, Classics #6.
Anna-Karin made a card with hot-air balloons flying over an inky watercolour landscape:
I did a watercolour background with Distress Inks, which is one of the techniques I use the most; I love the unexpected results and happy surprises you can get. This time it looked like a landscape from high above and I added just a bit of stamping, not wanting to cover too much up. The hot-air balloon stamp I wanted to use was too big and shrink plastic, another favorite, solved this problem. After shrinking the pieces, they were coloured with alcohol inks, backed with text paper and coated with Glossy Accents.
Sarah created a tag full of Grungy blue tones to showcase her two favourite techniques... flowers and grunging it.
I absolutely love the colour of Weathered Wood Distress Ink it's such a great shade to work with. I'm a fan of blue on any day of the week, and by adding touches of Broken China and Walnut Stain Distress Inks,you have the perfect trio for playing with Tim's Rusted Enamel technique. I created two embossed grunge roses using Paper Artsy's great die to be my main focal point and then went to town with lots of metal accents using ideaology and random stitching to complete her tag.
I encourage you to check out each of the design team member's blogs for more photos, supply lists, and more.Simply click on their name (above the photo of their project) to visit their blog.
Now that we've shared their creations - we're ready to see your favorite techniques!
As always,Simon Says Stamp is giving away a $50 gift voucher that will go to a random entry chosen by Random Generator. The challenge will close at Midnight Eastern time on Monday, August 19 and the winner will be announced a few days later in the week.To qualify all you need to do is create a new project that ties in with our theme and post it to your blog, then add a link here.
For the full rules, read the "challenge rules" posted in the side-bar here on our blog. We can't wait to see what you make!


.jpg)


